-------------------------------------------------

a mirror of this book is available for free. just go to https://bit.ly/barrio-golf-book and click "continue to destination" if you need to. if you get any benefit from my work, all i ask is for you to pay it forward as best you can.

Table of Contents
I. Why I Wrote This Book
Golf seems
like a very boring sport to anyone who has never tried it. But golf is actually
considered the greatest game mankind ever invented. Michael Jordan, who is considered
the greatest basketball player of all time, even said he enjoys golf more than
basketball.
The reason
why golf is not very popular is because it is too expensive for many people. Even
driving ranges and simulation/digital golf are too expensive for most people.
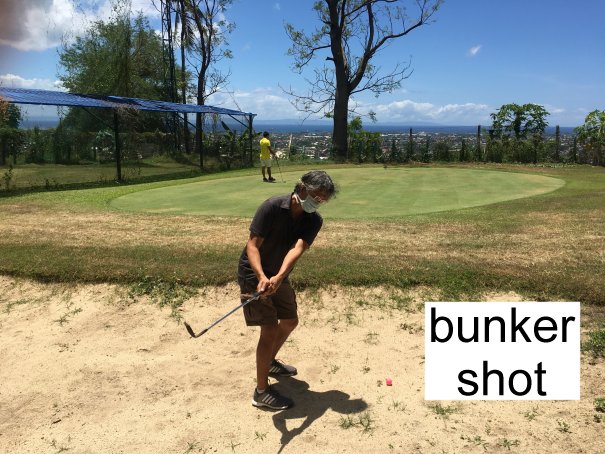
Besides, you can’t hone your putting, chipping, sidehill shots, and bunker
shots in a driving range or golf simulator. Barrio golf solves that problem. It
is an affordable way for anyone to enjoy and master golf.
In barrio
golf, you can learn the difficult skills required to master golf. There are
some minor skills such as club selection and speed control on the greens that
you can only learn at the golf course. But they are the easy part of golf.
Anyone can quickly learn them after just a few rounds at the golf course.
Another
barrier to the enjoyment of golf is that for many people, golf is too
difficult. Michael Jordan also said that he finds golf more challenging than
basketball (search in Youtube, “Michael Jordan and Stephen Curry Talk Ryder
Cup, Golf, Basketball”). However, I discovered a simplified style to make golf
easier so that people who are not very coordinated can master and enjoy golf.
The complete
tutorial for my simplified style is in a separate book entitled “Golf for
Uncoordinated Intellectuals”. But that book is for golfers who have been
playing for many years. Beginners might not understand some terminologies and
concepts in that book. This book also serves as a primer that enables beginners
to understand most of the terminologies in that book. If you have the time,
discipline, and perseverance to master what I am teaching in that book, you can
easily beat 95% of the golfers all over the world.
My strong
urge to write this book was based on the following theses.
A. Thesis 1: For many people, golf is important to their emotional well-being.
A rapper
named Macklemore won a Grammy award for best rap album. That’s a much higher
achievement than winning America’s Got Talent, X Factor, or American Idol
contests. If you have all the fame, honor and money a person could ever want,
shouldn’t you be content and happy in life? Yet, Macklemore started using drugs
and spiraling downward even after winning the Grammy. But when Macklemore started
playing golf, he became more content and happy in life and stopped doing drugs
(search in Youtube “rapper and multi-grammy winner finds happiness in golf”).
Golf seems like a boring sport. But many billionaires enjoy golf more than riding their private jets and cruising the Bahamas in their super yachts. They have everything and can do anything, but they enjoy golf more than anything. So I tried to analyze and understand this strange phenomenon.
I'm not an
expert on anything, but i notice humans don't really act according to moral
virtues. We act according to our biological programming because it's what makes
us feel good. It just happens that most of our moral virtues are part of our
biological programming and survival instinct. I don't think anyone ever had sex
with the goal of preventing our species from going extinct in mind. Lots of
very caring people including me eat innocent cows and chickens even if there
already are plant based alternatives. Lots of very smart and educated people
won't quit smoking even if they know it causes cancer.
We are all
stimulant addicts. We need stimulation just to feel normal. This is the reason
why Warren Buffett, who is 90 years old and already has $100 billion, continues
to work hard even if he does not care about money. He donated half of his
wealth to charity and will be donating most of it when he dies. He has a modest
lifestyle and lives in the same house he bought 60 years ago.
This
explains why artists will get depressed if they are banned from expressing
their art, even if art don't have any economic benefits. This explains why those
with strong parental instincts will feel miserable if they don't have kids,
even if having kids only makes one's life much harder.
We all have
different roles in society based on our genetic makeup. Just like in an ant
colony where there are worker ants and soldier ants. Our stimulant type depends
on our role in society. I have this theory that golfers have the hunter genes.
Golf is similar to hunting. You need to be quiet and accurate in using a tool
or weapon to hit something. Maybe it explains why golfers get so mad if they
make a bad shot even if they know golf is just a useless game. Maybe golf is a
means to satisfy a primordial instinct that evolution has not yet removed but
is already obsolete in the modern socio-economic system.
Humans have
existed for 200,000 years. If you view time according to the scale of human
evolution, it's only very recently that we don't need to hunt for our food
anymore. So the desire to hunt is still very strong in our genetic code.
Similarly, maybe people who enjoy playing football and basketball have the
warrior's instinct.
Maybe it
explains why many ultra-rich people enjoy fishing even if they can have the
freshest fish delivered to their personal chef. They even return the fish to
the water after catching it. Just like some people need to create art even if
it's not necessary for their survival, maybe for people born with hunter genes,
playing golf will contribute to their mental and emotional well-being.
My theory
also explains the mystery why golfers get very angry after missing an easy shot
even if they know golf is just a useless game. I think It’s their instinct
punishing them or warning them that if they continue to make mistakes, their
family or tribe will go hungry. It’s the same explanation why we get very
depressed when we break up with our partner. It’s nature’s way of punishing us
because it decreases our chance of producing an offspring and is detrimental to
the survival of our specie.
If you are
offended by my theories, i have more bad news for your imagined self-importance.
Our planet is just a tiny and obscure speck of dot in the vast universe.
Nothing demonstrates the folly of human conceit more than astronomy (Carl Sagan's
a pale blue dot). Even if you discover a cure for cancer, all humans will soon
be gone as if we never existed. The human species is nothing but a short term
visitor in the cosmic time scale.
If there is
something you can do that is harmless and feels good, just do it. At the end of
the day, be thankful for the opportunity to enjoy the many blessings in life. The
quality of life of a barrio golfer is much higher than 99% of all the kings and
queens that existed in history.
My
biological programming just happens to include helping other people. I'm
writing this book so my millions of imaginary followers can benefit from my
hard work.
Here's a
beautiful quote from Arnold Palmer entitled "Essence of Golf":
"golf is deceptively simple and
endlessly complicated; it satisfies the soul and frustrates the intellect. It
is at the same time rewarding and maddening – and it is without a doubt the
greatest game mankind has ever invented."
You might
argue that of course Arnold Palmer would say something nice about a sport where
he is a legend. Even the champions of sepak takraw would say the same thing
about their sport. But golf is the only game where the legends of other popular
sports would say they love golf more than their own sport.
Golf is the
most addictive sport. Lots of blind people even get addicted to golf. There are
even golf tournaments for blind people.
There is no
silver bullet that can solve the drug epidemic. But I believe barrio golf can
contribute in preventing our youth from resorting to drug use. What’s great
about golf is that everyone can participate and win because of the handicapping
system. Nobody gets benched. Unlike other sports which could backfire and hurt
the self-esteem of kids who are not good enough to play.
Barrio golf
could also contribute to the economy. Barrio golf bars could become popular
just like karaoke bars and dance clubs. There could be a high demand for golf
instructors or GI’s, similar to the dance instructor or DI jobs that were vital
in relieving the economic sufferings of many of my dear friends.
I also believe that barrio golf bars will be more sustainable than dance clubs and karaoke bars. I notice the passion for dancing and singing don’t last that long for most people. It’s very rare to see someone who is passionate about dancing or singing all their life. But I know so many golfers who’ve been passionate about golf their entire life. Even if they are 80+ years old, they still play golf almost every day.
B. Thesis 2: Filipinos have a better chance winning an Olympic medal in golf compared to basketball.
Basketball
has captivated the heart of the Filipinos. It is the most played and the most
popular sport in the Philippines. Unfortunately, Filipinos have a disadvantage
in basketball when it comes to international competition because height and
athleticism is a big factor.
I think the reason why Filipinos love basketball is because anyone can enjoy practicing or shooting hoops alone. The feeling of the ball swishing in the net is very therapeutic. But barrio golf is also something that anyone can practice alone at home, and the feeling of hitting a good shot is even more therapeutic and even addictive. Barrio golf can be just as exciting and thrilling as basketball. But instead of just being a spectator, anyone can actually join a tournament and win.
Imagine you can enjoy and master the sport of billionaires even if you are just a regular person living in the barrio. The pleasure in golf doesn't really come from the beauty of the golf course. The pleasure in golf comes from the feeling you get when you hit the ball with the sweet spot of the clubhead. You can experience that same pleasure inside a barrio golf hitting cage. The pleasure in golf also comes from the thrill and excitement when competing against your friends. Playing barrio golf with your friends can be just as thrilling and exciting as playing on the golf course.
Therefore, I believe
Filipinos will fall in love with golf. But unlike basketball, height and
athleticism is not a big factor in golf. So Filipinos have a better shot at
winning an Olympic medal in golf compared to basketball.
In fact,
Filipinos have beaten the best players in the world many times. In 2012, I was
chatting with a fellow Filipino at the Las Vegas Golf Club driving range. I
told him the Philippines should find a way to make golf more accessible to the
masses because it’s where I think we have a good chance in winning an Olympic
medal. I mentioned Jennifer Rosales as an example. Jennifer won an LPGA
tournament in 2004 and 2005. She has beaten the best players in the world,
including the legend Annika Sorenstam, many times.
Then, the
Filipino I was chatting with told me her daughter won 4 LPGA tournaments. At
first I laughed because I thought he was joking. Then the other Filipinos
around us told me it’s true. So I immediately googled it and was so surprised
and happy to learn it was true. Turns out he was the father of Dorothy Delasin.
Dorothy won 4 LPGA tournaments between 2000-2003, including the 2001 Samsung
World Championship.
When I asked
him where is Dorothy now, he pointed me to a lady in the nearby stall sitting
down while watching her kids practice. I did notice her a few times in the
driving range before, but I never thought she was even a golfer. I did remember
her hitting a few balls but she was wearing high heels and laughing as if she
was just trying it out for fun. Who would have thought she won 4 LPGA tournaments
where the best players in the world compete?
Just
recently, Filipinos such as Yuka Saso and Jason Day have won major golf
tournaments.
The problem
right now is only very few Filipinos have the opportunity to enjoy and master
golf. Barrio golf will solve that problem by allowing more Filipinos to enjoy
and master golf.
There are
many other sports where Filipinos also have a good chance to win an Olympic
medal. But it’s difficult to encourage people to participate and train in a
sport that is not fun and exciting.
Barrio golf
tournaments can help discover “phenoms” or rare talents. The government
commission in charge in developing our Olympic and Asian Games athletes can
help sponsor the chosen phenoms and allow them to play for free in any of our
military golf courses around the country.
II. Building the Barrio Golf Facility
All efforts
have been made to address any possible issue in the construction so that you
just need to follow the instructions step by step.
The grand total
cost of materials is approximately P14,626 or $271 (at the time of this
writing, $1 = P54). I will include the price I bought each material to give a
rough estimate on the cost.
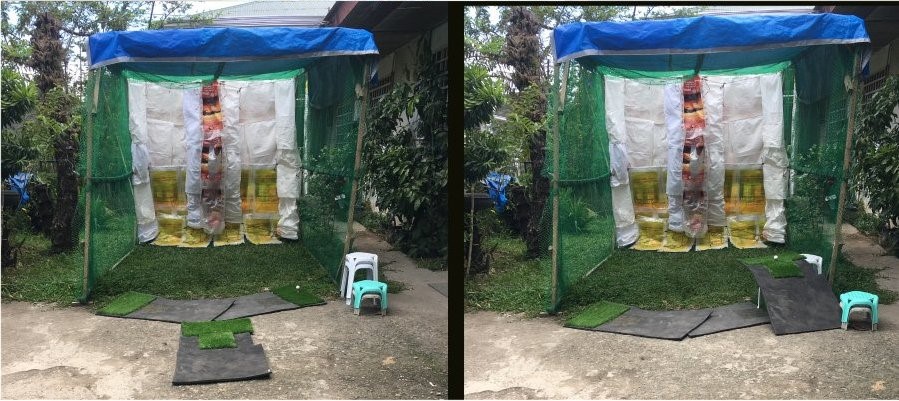
A barrio
golf hitting cage should be 4 yards long and 3 yards high. The cage we will be
constructing is 3 yards wide, but it’s just a compromise between cost and
having enough space for the follow through without the clubhead hitting the
frame. If cost is not an issue, a cage that is 4 yards (12 feet) wide is
better.
You will
need a step ladder at least 5 feet high (depending on your height) to construct
and maintain the hitting cage. You can buy an aluminum step ladder online for
P2,500 including shipping. Or you can search “DIY step ladder” in Youtube to
make your own wooden step ladder at a cheaper cost. I didn’t include the step
ladder in the cost computation because it’s more of a tool you can use for many
other purposes.
A. Cage Framework

I designed
the hitting cage in such a way that it is easy to disassemble/assemble. This
makes it easier to transport to barrio golf tournament venues.
If you are
not the do-it-yourself type, you can hire a carpenter to build the framework.
But you need to make sure the carpenter follows the instructions in this book
or else your hitting cage will require a different set of instructions to
disassemble and assemble, which could hamper tournament operations. The photos
in this book makes it easy for the carpenter to know what needs to be done.
Tools:
- Saw
- Power drill
- 5/16” and 1/8” drill bits
- Wrench. The hex nut of a ¼” bolt is usually 10mm and the head is 11mm.
- Pliers or another wrench
- Phillips screwdriver
Materials (total cost estimate = P2,129):
1) 12 pieces, 2-inch X 2-inch X 12-foot coco
lumber: P132 each = P1,584
You can use
a different type of lumber as long as it has similar durability and
flexibility. Folks in the hardware store or lumber yard should be able to suggest
an alternative if coco lumber is not available.
2) 40 pieces, ¼-inch X 4.5-inch bolt + nut + 2
washer set: P6/set = P240

A bolt and
nut set includes 2 washers. So there should be at least 40 X 2 = 80 washers.
The variety hardware stores can be very expensive, especially the ones at the
mall. Try to google “bolt center” and hope there is a store in your area that
specializes in bolts.
You can also
order online. It’s more expensive than a specialty bolt store but much cheaper
than a variety hardware store. Example, the total cost for the cheapest ones I
found online would be P657 including shipping.
For the
bolts, search “1/4-inch GI galvanized hex bolt”. Make sure to choose the one
that is 4.5 inches long.

For the hex
nuts, search “GI ordinary hexagonal nut 1/4”. Make sure to choose 50 pcs.

For the washers, search “GI flat washer 1/4”. Make sure to choose 100 pcs.

If you don’t include the keyword “GI” or “galvanized” in the search, the search results will usually display the stainless steel ones, which are 5 times more expensive. Example, the stainless steel ones I found online would cost you around P2,300 total instead of P657. However, stainless steel is actually better because it does not rust. If money is not an issue, go ahead and buy the stainless steel ones.
3) 2 pieces, 1/8-inch X 3-inch wood screw:
P30 each = P60
You can get
this at any hardware store in the mall.

4) 60-80 ml/cc of black, white, red, yellow
and blue enamel paint: P30 each = P150
Not all
hardware stores sell enamel paints in such small cans. Example, there were 3
hardware stores inside the mall I went to and only one (Ayala Metro) had them.
The paint will be used to label the joints of the framework so that it will be
easier to assemble. Using a different color to label each joint will make it quicker
to know where each part belongs. However, using only one color is also ok. You
can order enamel paint online. Try the search phrase “enamel paint 80ml” or
“enamel paint 60 cc”.
5) fine arts brush: P22
I recommend
the flat ¼”-inch X 1/8”-inch brush tip. You can buy it at National Bookstore.
6) paint thinner: P73
7) 4 disposable cups: (you can just cut
out small water bottles)

Step 1: Cut 6 pieces of 12-foot lumber to 9
feet in length. Save the 6 remaining 3-foot slabs because they will be used as
brackets. Cut one of the 12-foot lumber into 4 equal pieces. This means each
piece will be 3 feet long. Then cut 2 of the 3-foot pieces by half (each cut
will be 1.5 feet long). In total, you should end up with 8 pieces of 3-foot
brackets and 4 pieces of 1.5-foot brackets in addition to the 5 pieces of
12-foot lumber and 6 pieces of 9-foot lumber.
Step 2: Make the 9 feet by 12 feet top
frame. Let’s agree that the parts of the hitting cage will be specified
according to the perspective of a person standing at the entrance and facing towards
the target inside the cage.

Leave a 2-inch
space at each end of the 12-foot beam so that the bolts won’t stymie the bolts
for the stands. Use a 5/16-inch drill bit, which is slightly thicker than the ¼-inch
bolt. Use washers on both ends of the bolt. Sometimes, the coco lumber is too
hard for the 5/16-inch drill bit. Drill it first with a 1/8-inch drill bit so
it will be easy for the 5/16-inch drill bit to penetrate. Don’t worry if a hole
is not perfectly straight. All parts will be labeled so during re-assembly, it
will be easy to put back each part where they originally belong. This ensures
all holes will align for the bolts to be inserted.

When
tightening a nut, use pliers or another wrench to hold the other end of the
bolt if it slips.

Step 3: Attach the four 9-foot columns or
legs on the outer side of the top frame.

Step 4: Let the two legs on the entrance
side stand and install the brackets. The 3-foot brackets should always be on
the left or right side. The 1.5-foot brackets should always be on the entrance
or target side. The upper end of each bracket should be on the outer side and
the lower end should be on the inner side.


When
drilling a hole for the bolt, drill on the bracket first. Then drill on the
frame with the drill bit still inside the bracket. This ensures both holes will
align for the bolt. If the drill bit is slanted after drilling on the bracket, choose
a location on the frame such that the bolt will go through the center core of
the wood. Example, in the photo below, if you drill the second hole at the
center of the 2-inch side even if the drill bit is slanted, the bolt will be
too far from the center core, resulting in a weak joint. You need to drill more
to the lower side for the drill bit to pass through the center core. If the
drill bit is not long enough to go through both slabs, you can remove the bracket
after the drill bit has reached its limit on the frame slab. Anyway, the
partially finished hole on the frame slab already provides a good guide for the
drill bit to align with the hole on the bracket slab.

Step 5: Repeat step 4 for the target side.
Step 6: Attach the two 12-foot bottom side beams.
You may need to bend the legs inward a little bit for the 12-foot beam to reach.
This is because the top brackets cause the legs to spread outward.
Step 7: Install the bottom beam on the
target side. Measure the length required before making the cut. It should be a
little more than 9 feet (also due to the top brackets spreading the legs
outward). Example, the front bottom beam could be 9 feet and 5 inches. Cut the
remainder slab in half so you will have 2 additional short brackets.

Use a 3-inch screw instead of a bolt when fastening the bottom
beam for the target side. Drill a hole using a 1/8” drill bit to make it easy
for the 3-inch screw to be screwed in.

Step 8: Attach all the bottom brackets. The
four 3-foot brackets should be on the sides while the 2 short brackets should
be on the target side. However, unlike the top brackets, both the upper end and
lower end of all the bottom brackets should be on the outer side of the framework.
Step 9: Label the frame parts. The hitting
cage should be easy to disassemble and assemble. This makes it easier to
transport and use in tournaments. It also makes it easier to buy and sell.
When assembling, each wood in the framework needs to go back
to where it originally belongs in order for the holes to align. Therefore, a
labeling system is necessary. The labeling system should also be standard so that barrio golf
technicians only need to learn one system.
The numbering starts at the top left corner at the entrance and
goes clockwise. Number 5 starts at the bottom left corner at the entrance and
also goes clockwise.
Color coding is optional. But if you choose to color code the
labels, you need to adhere to the following standard.
1:white 5:black
2:red 6:orange
3:yellow 7:green
4:blue 8:violet

Notice the non-neutral colors at the top are the primary
colors. The order should be easy to memorize if you remember the ROYGBIV
mnemonic for the rainbow colors. The red-yellow-blue sequence is the same as
they appear in ROYGBIV.
The non-neutral colors at the bottom are also easy to
remember. It’s simply the combination of the primary color directly on top of
it and the next primary color in the circular sequence. Example, number 6 is
orange because on top of it is red and next to red is yellow. This means to
produce orange paint, mix equal amounts of red and yellow. To produce green,
mix equal amounts of yellow and blue. To produce violet, mix equal amounts of
blue and red.
B. Netting

Tools:
- Power drill
- 1/8” drill bit
- Screwdriver
- Scissors
Materials (total cost estimate = P3,580):
1) 5 pieces, 1-inch X 2-inch X 12-foot coco
lumber: P60 each = P300
The home
builder stores I went to did not have any 12-foot one-by-twos. Only lumber
yards sell them. An alternative is to connect 2 pieces of 8-foot one-by-twos.
If using softer wood such as pinewood, use a 1/16” drill bit instead of 1/8” to
drill the holes for the screws.
2) 200 pieces, 1/8” X 2-inch screw: P280
The hardware
store inside the mall I went to sold them individually for P25 each. The home
builder store sold them for P140 per 100-piece pack. You can also buy the
cheaper gypsum screws.
3) 115 meters X 1.5 meters 1-inch (2.5cm) hole
(or less) range net: P3,000
The local
fishing supply store in my hometown sells them for P75/meter (P8,625 total).
It’s much cheaper to buy online.


The net with
½ inch hole is the most ideal because it’s much safer. However, it can cost
P5,000 for 100 meters. If the barrio golf facility will be in a place that
requires extra safety (e.g. high traffic area), you should get the ½ inch hole
net.
Always use
the “Cash on Delivery” payment option when ordering the net online. When it
arrives, bring your phone, cutter, measuring tape or ruler, and scotch tape. Before
paying the delivery person, make a small cut on the wrapper to inspect and make
sure the side of the square hole is not bigger than 1 inch. The ball can go
through even if it’s 1.25 inch. So do not pay if it’s more than 1 inch. Take a
photo and tape the cut you made on the package. Then inform the buyer about the
mistake they made on the order.


Step 2: Screw the net holder screws
approximately 1-inch deep and approximately 1 foot apart from each other. This
means there should be 12 screws in a 12-foot 1x2 and 9 screws in a 9-foot 1x2.

Step 3: Install the hangers. Make sure the
center ceiling slab is at the center of the cage. Make sure the fastening screws
are diagonal and not horizontal. The purpose of the diagonal screw orientation
is so that it will provide a good hold or ANCHOR even if the hole has become a
little bit loose after lots of assembly/disassembly. Note in the photo below, I
did not yet screw the fastening screw all the way so that you can see the
orientation. Also, the screw below it is actually a net holder so the
orientation is correct. The “wrong” label is only to show you that it would be
a wrong orientation if it fastens the hanger. Then label the ends of the
hangers. Example: side left entrance

Step 4: Screw the rest of the net holder
screws around the outer sides of the frame. All net holder screws should be
oriented horizontally except the center ceiling hanger. They should also be
1-inch deep and 1 foot apart. The ones on the entrance stands should be located
at the sides. The ones on the target wall should be located at the back side.

Step 5: Install the nets. There will be 4
main pieces of nets, and 6 safety pieces. 2 of the main pieces will drape over
the roof and target wall while the other 2 will wrap around all the sides. Note
the target wall will be double layered, which is what we want for safety.

The net
should wrap around the cage frame before hooking the side end to the holder
screw. This means the side end of the net will have to go through a net hole
after wrapping around the frame to get to the holder screw. Use rocks or wooden
slabs to temporarily elevate the frame so you can wrap the net underneath it.

Create
enough slack to allow the side end to wrap around the frame and reach the
holder screw. However, if there is too much slack you could leave a dangerous
opening where the ball can pass through. You may need to do some trial and
error in the beginning. After a while, you will get the hang of it and develop
the feel for the amount of slack required. If it’s difficult to add more slack,
that means the net is stuck in a nearby screw or bolt. Just free up the net.

Sometimes, it’s
not possible to lessen the slack because the net is not properly aligned. In
this case, the only way to get rid of the slack is by hooking one of the holes
in the slack to a nearby holder screw.

Make sure
you securely cover the corners by wrapping the net around the corner before
hooking the side end to a holder screw. Do the same for the bottom corners.

Do not make
a cut until you completely installed a piece. Leave a 3-foot extra allowance.
The reason for the extra allowance is, when re-assembling in the future, the
assembler might install the net a little looser than how you installed it,
which results in the net not being able to completely cover the portion of the
cage it is supposed to cover.

With the 4
main net pieces, only the target wall will have a double layered netting. The 6
safety net pieces will make the sides and ceiling of the cage also double
layered.

The 6 safety
net pieces are quicker to install. Install each piece from the inside of the cage. Let the side end of
the net go over the slab and anchor it to the holder screw at the back. This
means the net only wraps around a slab halfway for the 6 safety pieces. Unlike
the 4 main pieces where it does a full wrap around a slab.
Start at the
entrance and work your way towards the target wall. Leave a 1-foot extra
allowance at the entrance. When you reach the target wall, continue up to 2
holder screws along the target wall. Then leave a 1-foot extra allowance before
making a cut.

This means
the sides of the target wall will be quadruple layered if you include the sack
wall, which we will install next. Unlike most hitting cages where the sides are
the least secured.
You really
don’t need an assistant who will receive the net on the outer side and hook it
to the holder screw. The net is usually
loose or saggy so it’s easy to work from the inside.
However, there could be portions where the net is tight. In this case, make a big loop, thread the loop into a hole and use a finger from your other hand to catch it on the outer side. Then anchor the loop to the holder screw at the back.

In case you
are interested, here’s the math on how I figured out the length of the net you
need to buy. The rule of thumb is the length of 6-foot wide net required is conservatively
twice the total Iength it needs to cover. That’s because the length specified
by the seller is measured when the net is rolled up, which means the square
holes are closed. When you spread the net to 6 feet wide, the length
contracts.
Example, if
the sides of the tilted square holes are 1-inch long, if you close or collapse
the hole, which is what happens when the net is rolled up, the length of each
closed hole becomes 2 inches. When you spread out the net to become 6 feet
wide, each hole is now 1.41 inches wide. That’s because the diagonal of a
square is the square root of 2 times the side of the square. However, the
installer of the net might spread the net too much such that the length is now
just 1 inch. Just to be conservative, let’s buy a net that is twice the length
it needs to cover.
The hitting
cage is 12 feet x 9 feet x 9 feet. Therefore, main nets 1 and 2, which covers
the ceiling and target wall, will need to cover 12 feet + 9 feet = 21 feet each
for a total of 42 feet. Main nets 3 and 4, which covers the sides and the
target wall, will need to cover 12 feet + 9 feet + 12 feet = 33 feet each for a
total of 66 feet. The 6 safety layers need to cover 12 feet each for a total of
72 feet. The total is 42 + 66 + 72 = 180 feet. Therefore, we need 180 feet x 2
= 360 feet of net. We also want to have an extra 3 feet allowance for each
piece of net just in case the net is not efficiently installed. We have 10
pieces of net so the total allowance is 33 feet. The grand total is 393 feet or
119 meters. But as I said, this is just conservative. Most likely you will only
need 100 meters. But you should order the extra 15 meters of net just in case.

C. Sack Wall

Nets will start
to have holes after just a few weeks of practicing every day. Nets are
expensive and tedious to replace. The solution to this problem is to add a 3rd
layer to the target wall, but using the more durable, cheaper and easier to
replace rice sacks. A 2 feet x 3 feet rice sack is only P7 ($0.24 cents) and
can easily last for 6 months of daily bombardment.
Tools:
- Scissors
- Measuring tape
Materials (total cost estimate = P752):
1) 35meters (115 feet) 5mm (3/16 inch) thick
nylon rope: 200-meter bulk = P500
You can buy
this for P5/meter at a fishing supply store. It is more expensive online if you
buy per meter. But you can buy a 200-meter bulk online for P500 including
shipping. Let’s buy the 200-meter bulk since we will be needing a lot more
later when making the target strips.
2) 36 pieces, ~2-feet X ~3-feet rice sack: P7
each = P252
You can buy rice
sacks at the public market. In Cebu City, you can buy them in the rice section
of Taboan public market. Buy the glossy premium rice sacks because they last longer. Avoid the softer flour sacks. You will also need 28 rice sacks for the target strips,
bunker shot net, and chipping basket so go ahead and buy 36 + 28 = 64 rice
sacks. It is ok if the sacks vary a little in size. If the ground is not even
and there are gaps beneath the frame, buy some extra sacks to stuff the gaps.
Step 1: Cut 8 lines of 5mm nylon rope 13
feet long each. Then insert 5 sacks on 4 lines and 4 sacks on the other 4 lines
in such a way that the stitched end of the sack will be the one touching the rope.
Use scissors to make an incision just big enough for the rope to go through.

Step 2: Install the sack wall. There will
be 4 rows. Each row will overlap the row above it. Each row will have 2 layers.
The first layer has 5 sacks right next to each other. The 2nd layer
has 4 sacks, each covering the spaces between the sacks of the first layer. I
temporarily lowered the 2nd layer of the 4th row so you
can see.

To prevent
the rope from fraying, always create a knob using an overhand knot at each end
of all the ropes used for the hitting cage. And always use 4 double half hitch
knots to tie a rope to the frame. We need 4 double half hitch knots because nylon
ropes are slippery, which can cause a single half hitch knot to become lose.

Tie the
middle of the top row to the center ceiling slab (both layers).

For the 1st
row (top most) and 3rd row, there should be approximately 3 inches
of space between the sacks and the target frame to provide enough cushion. This
prevents the net and sack from getting smashed between the ball and horizontal
slabs at the target frame, which causes the net and sack to deteriorate faster.
Raise the 3rd row using a chord tied to the ceiling center slab. The
column slabs and brackets will be protected by the target strips which we will
install next.

So that it will be easier to find the ball, the bottom of the upper sack should cover the top of the lower sack, just like roof tiles.

Lastly, if the ground is not even and there are gaps beneath the frame, stuff the gaps with rolled up sack
D. Target/Cover Strips

We will be
making 5 sack strips. 3 will be used for target and the other 2 will be used to
cover the column slabs and brackets at the target side.
Tools:
- Scissors
- Measuring tape
Materials (total cost estimate = P165):
1) 82 meters (267 feet) 5mm (3/16 inch) thick
nylon rope: (already bought 200-meter bulk)
2) 20 pieces, ~2-feet X ~3-feet rice sack: P7
each = P140
3) masking tape or blue painter’s tape:
P25
Step 1: Cut 10 lines of 5mm nylon rope 15
feet long each. Let’s call these the vertical chords of the target/cover strip.
Then, cut 20 lines of 5mm nylon rope 40 inches
long each. Let’s call these the horizontal chords of the target/cover strips.
Step 2: Insert a 40-inch horizontal chord into each rice sack the same way you did when making the sack wall.

Step 3: To make a target/cover strip, get 4
sacks and insert a vertical chord through each side. Straighten both vertical
chords by taping the ends to the floor or tying them to a chair. The top of the
first (top most) sack be 2 feet from the end of the vertical chord. On 4 of the
strips, the top of each successive sack should be 1 foot above the bottom of
the sack above it, while one strip would have the top of the successive sacks be
1.5 feet above the bottom of the sack above it (this would be the 1-foot wide
target strip). Temporarily fold the bottom of each sack to shorten it so it
will be easy to position the next sack and fasten the horizontal chords to the
vertical chords. To fasten a horizontal chord to a vertical chord, simply twist
the vertical chord to create a space between the braids and insert your pointer
finger. Then insert the horizontal chord by pushing it with your thumb. Then
make 2 overhand knots at the end.

Step 4: Run 2 chords (5mm nylon rope) across
the ceiling. The first one should be 6 inches from the sack wall and the second
one should be 6 inches from the first one. Let’s call these the target/cover
strip hanger chords. Both hangers should go over the center slab. Then run
another 2 chords across the floor, where the first one is also 6 inches from
the sack wall and the second one is 6 inches from the first one. Let’s call
these the target/cover strip anchor chords.

Step 5: On the first hanger chord and anchor
chord, mark 1.5 feet from the center with masking tape on both the left and
right side. Note the ceiling center slab should be the center (if you followed
the previous instructions) so you can use that as reference. To know where the
center is on the anchor chords, suspend any heavy object with a string hanging
from the ceiling center slab. Also mark 6 inches on the left and right from the
center on all 4 hanger and anchor chords. Then, temporarily loosen the hanger
and anchor chords so that you can separate the braids by twisting.

Step 6: Insert the ends of the target strips
in between the braids where you marked them. Note 2 target strips combine to
make the 3-foot wide target. Then tighten the hanger and anchor chords again.
Also tighten the vertical chords of the target strips. Always tie the vertical
chords of the target strips on the hanger or anchor chords. Never tie the
vertical chords to itself or else it would just be partial strands supporting
the target strip and not the entire chord.

Step 7: Remove the slack at the top of both
target strips for the 3-foot wide target by pulling the 40-inch horizontal
chord and tying it to the vertical chord. Also tie the top center of the 1-foot
wide target to the ceiling center slab directly above the 3-foot wide target.

Step 8: Tie the middle of the overlaps in the
1-foot target with 1-foot chord and 3 half knots. Also decrease the width
between the overhand knots of the horizontal chords to lessen sagging. If the sack used is not stiff enough, you might need to add more ties at the sides to prevent it from bulging out.

Step 9: Cover the target frame columns and
brackets with a cover strip. Also fasten the middle part of the cover strip.

Step 10: Direct exposure to the sun causes the sacks to become brittle. You can cover with 6 ft X 10 ft tarp. Or, you can spend P1,700 for a more permanent cover using ultra-thin (#24) corrugated sheets. Use screws instead of nails so the sheets are easy to take down when a strong typhoon is approaching.

E. Hitting Mats and Stools for Sidehill Lies
It would be
more convenient if you have a separate hitting mat for chipping and for shots
that require ball speed detection by the launch monitor device (e.g. Shot
Vision on the iphone). That’s because when chipping, the mat will have to be
frequently moved around for the various chipping distances. It would be a
hassle having to keep aligning the mat again when transitioning from chipping
to a shot that requires ball speed detection.
If there is
a right handed and left handed player, it would also be more convenient to have
a separate stationary (non-chipping) mat for the left handed player for the
same reason.
Hitting mats
should be big enough for the player to stand on so that the weight of the
player will prevent the mat from moving when the clubhead hits the mat. However,
mats that are large enough for a player to stand on cost around P5,000 ($100).
Since you will need a separate mat for chipping and left handed players, it
could total P15,000.
Fortunately,
I found a way so that the total cost of all 3 mats is only around P723.
Tools:
- Heavy duty scissors
- Measuring tape
- Putty knife
- Rubber mallet (preferable) or ordinary hammer
- Cutter
- ½ inch wide kitchen knife (preferably serrated)
- Hack saw (fine toothed saw usually used for cutting metal)
Materials (total cost estimate: P2,347)
1) 4-feet X 8-feet 12mm (1/2 inch) thick
rubber sheet: P370
You can buy
this at a store that sells upholstery fabric or shoe/bag materials. In Cebu
City, you can buy this at Progress Marketing (not Progress Home and Office Furnishings).
You can also
order online but it is more expensive. The cheapest I found online was P1,039
excluding shipping. Search for “EVA rubber sheet” and make sure to choose one
that is at least 12mm thick. EVA is acronym for Ethylene-vinyl acetate (also
known as poly because it is a polymer).
2) 1-meter X 2-meter artificial grass/turf:
P273 (online)
It’s cheaper
to buy online. A 1 meter by 2 meter costs P500 at Progress Marketing. There are
different types of artificial grass or turf available. Any kind is ok. The type
of artificial grass can affect your game. But that’s golf. Golf courses also
have different types of grass.
3) 1 bottle of rugby: P80
4) 3 pieces, 70 mm (2.75 inches) rubber tee: P224
(including shipping)
In regular
golf, the player has a choice on tee height. In barrio golf, there is a rule which
states the ball shall always be tee’d up between 1.75 to 2.25 inches above the
solid layer of the mat (bottom of the artificial grass blades), except when
chipping.

Example, if
the grass blades are ½ inch high, then the top of the tee should be between
1.25 to 1.75 inches from the top of the grass blades.
The thicker
the rubber sheet, the longer the rubber tee needs to be. Example, if the rubber
sheet is ½ inch thick, the rubber tee needs to be between 2.25 inches to 2.75
inches long. If the rubber sheet is 1-inch thick, then the rubber tee has to be
between 2.75 inches and 3.25 inches long.
You can
order the 70mm (2.75-inch) or 80mm (3.15-inch) rubber-tees and just cut them
with scissors to make them 2 inches above the solid layer of the mat.
5) 4 units, 17.5 inches high plastic stools:
P350 each = P1,400
These stools
will be used to hit ball-above-feet lies. There will only be 2 levels of
ball-above-feet lies. But you will need another stool of the same height for
the launch monitor device.
These stools
are common in the Philippines because they are the standard stool being used in
carinderias and canteens. You can buy them in most discount stores such as
Novo. In Cebu City, you can also buy them at Unitop and Gaisano department
stores.
Step 1: Figure out a way to optimize the size
of your hitting mats based on the dimensions of your rubber sheet. The
requirement for the stationary mat is it should be at least 4.5 feet by 2 feet.
The requirement for the chipping mat is it should be at least 3 feet by 2 feet.
Example, if
the rubber sheet is 4 feet by 8 feet, you can make 2 stationary mats that are 5
feet by 2 feet, and 2 chipping mats that are 3 feet by 2 feet. The rubber sheet
I bought was 7 feet by 4.5 feet. So I made 3 mats that are 4.5 feet by 2.33
feet each. This means my stationary and chipping mats are the same size.
Step 2: Use rugby to glue at least 1 foot by
2 feet artificial grass on one end of each rubber sheet. Use a putty knife to
apply rugby on both surfaces, then wait 25 minutes before putting them together
(note all smart phones have a timer). Then tap every square inch strongly with
a rubber mallet or lightly with an ordinary hammer.

Step 3: Make the holes for the rubber-tees.
For the stationary (non-chipping) mat, the hole should be 1 foot from the
target side, and 4 inches from side opposite where the player is standing. This
means the hole location would be different for the right handed and left handed
players.
Use the top
of the rubber tee as a guide to mark the circle. Then make the first cut using
the cutter. If the cutter blade is too short, complete the hole with a small
kitchen knife.
You won’t be
teeing up the ball when chipping. However, the chipping mat will be used to hit
ball-above-feet lies where the ball also needs to be tee’d up. The hole
location would depend on where the center of the stool would be when you place the
chipping mat on the stool. Position the mat on the stool in such a way the area
around the ball will be flat. Then create holes for the rubber tee 1 foot from
left side and 1 foot from the right side (so it can be used by left handed and
right handed players). This means the chipping mat will have 2 holes for the
rubber tee.

Step 4: Cut the stools using a hack saw. 2 of
the stools should have a height of 17.5 inches and the other 2 should have a
height of 8.75 inches. So if you bought the 17.5-inch high stools, you only
need to cut 2 of them.
F. Launch
Monitor Device and Lighting

Total cost
estimate: P2,616 (I didn’t include the Iphone in the cost computation because
many in the barrios already own Iphones and it’s more of a tool that you use
for other purposes.)
You can use
any launch monitor device. If you can afford it, the Garmin Approach R10 is
recommended, which costs around P37,500 ($750). However, the objective of
barrio golf is to make it more affordable to enjoy golf and master the
important skills. Therefore, this book will only talk about the free version of
the Shot Vision app on the Iphone. Since the free version can only issue ball
speed, barrio golf will use ball speed (in miles per hour or mph) instead of
distance.
If you use the Shot Vision app, keep in mind that the app gets upgraded from time to time and the instructions you find in the internet on how to use it can be outdated. Therefore, you should always use the instructions in the app. However, the instructions on the app are too basic, and you still have to do a lot of figuring out. The following is a more complete set of tips and instructions on how to use the latest free version of the app for barrio golf during the time of this writing. Some of the information may become outdated with newer versions of the app:
- The minimum hardware requirement for the Shot Vision app is Iphone 6s. In my experiments, I did not notice any difference between the ball speed readings and number of detection fails between the Iphone 6s and Iphone 11. Iphone 6s is a little slower, but takes longer to overheat. When the Iphone 6s overheats, the readings become even slower. But if the Iphone 11 overheats, the app will just freeze and stop working.
- It is recommended to use 2 Iphones so that when one Iphone starts to overheat, you can use the other Iphone while the current one cools down. The Iphone 6s takes longer to overheat, usually after 9 holes depending on the weather or air temperature. The Iphone 11 can sometimes overheat after only 3 holes. You can also turn off the Iphone while an mph reading is not yet needed (e.g. the player is putting or chipping).
- It is recommended that the Iphone is in airplane mode, wifi turned off, and Bluetooth turned off. This increases processing speed and avoid interruptions from incoming calls or messages.
- Barrio golf has a rule which states the ball placement shall never be inside the cage except when putting. The ball should at least be touching the imaginary line between the 2 entrance columns for it to be considered “not inside the cage”.
- It is also recommended that the imaginary line that passes along the ball and is perpendicular to the target line should go in the cage or at least touch the right entrance column of the cage frame.

- The Iphone should be oriented horizontally and the back camera should be facing towards the ball. It should also be approximately parallel to the target line and approximately parallel to the ground.
- The Iphone’s camera lens should be 10 to 11 inches above the ground.
- Start the app and click “FREE”. Do not click the “Start Practice ” or “Try Now” button because they will take you to the non-free version of the app.
- Choose left handed or right handed.
- Choose indoor or outdoor.
- Always choose “Driver” in club selection.
- Always choose “Ball Speed” for voice feedback.
- Click “Start Session”
- Position the ball and/or the Iphone so that the ball will appear inside the box in the lower left corner of the screen and between 1.75 to 1.9 feet away from the camera lens. The screen will show how far the ball is from the camera lens, so there is no need to do any measuring.
- Once the ball is positioned correctly, check again to make sure the Iphone is parallel to the target line and parallel to the ground. If you have to reposition the Iphone, you also have to inspect the ball position again and adjust if necessary.
- The app will say “ready” once the phone and the ball are correctly positioned. If you are using the Iphone 6s, never exit the session or the app while the app is in “ready” mode or else it can’t go into “ready” mode anymore. You will need to turn off and on the Iphone so the app can go into “ready” mode. If you need to exit the session while the app is in “ready” mode, just hit the ball and make sure the app issues the ball speed reading before exiting the session. Note that this problem does not happen in Iphone 11.
- The app will go into “ready” mode once it detects that the ball is anywhere between 1.75 to 1.9 feet away and inside the small box in the lower left corner of the screen. Although not necessary, if you want the ball to be more in the middle of the small box and more precisely in the middle between 1.75 to 1.9 feet away (e.g. 1.80 to 1.85 feet away), do not place the ball on the tee right away. Only place the ball on the tee after the top of tee is where you want it (e.g. in the middle of the small box and between 1.80 to 1.85 feet away).
- It would also be advantageous to the player if the hitting mat is parallel to the target line. You can reposition the mat by turning it while making sure the ball stays in the same location.
- Sometimes, if the ball trajectory is too high or too low, the app can’t get a reading even if the ball hits the target. Barrio golf has a rule which states that if the launch monitor fails to issue a ball speed reading and the ball hits one of the target strips, the player shall redo the shot without any penalty.
- With the recommended tee height of 2.5 inches and camera lens position of 10-11 inches above the ground, the app usually can’t detect the ball speed if the ball hits below 1.5 feet and above 7.5 feet at the target strip. If the camera lens is 18 inches above the ground, the app can detect the ball speed even if the ball hits the top of the target strip, but it can’t detect the ball speed if the ball hits below 3 feet at the target strip. If the camera lens is 4 inches above ground, it can detect very low ball trajectories, but can’t detect if the ball hits above 6 feet at the target strip.
- The color of the ball does not make a difference
- On average, a 2-piece ball goes 15 mph faster than a 4-piece ball such as a Prov-1. However, this does not mean a 2-piece ball will perform better on a golf course where wind and amount of roll is a significant factor.
By this
time, you should be convinced that it would be more convenient to have 2 launch
monitor devices so that you won’t have to go through the tedious task of
repositioning the device or ball location every time you switch between the
left handed player and right-handed player.
The overheat
protection mechanism in the Iphone will temporarily shut-off the phone after just
a few minutes of use if the Iphone is getting hit directly by the sunrays. The
solution is to put an umbrella at the roof of the cage to protect the Iphone
from the sun. Just remove the handle of the umbrella so the pole can fit
through the net. You can also use a 3-meter
by 3-meter tarp which you can buy in most hardware stores (P270).

When it
rains, make a small hole on the tarp in the middle of the area where the water
accumulates to prevent the weight of the accumulated water from exerting stress
on the tarp and cage.
The Shot
Vision app quickly drains the battery. Therefore, the phone needs to be plugged
to a power source to ensure you have enough power to last the game.
Do not try to cool the Iphone with an electric fan because it interferes with the motion detector. Just point the electric fan towards the player to keep mosquitoes away.
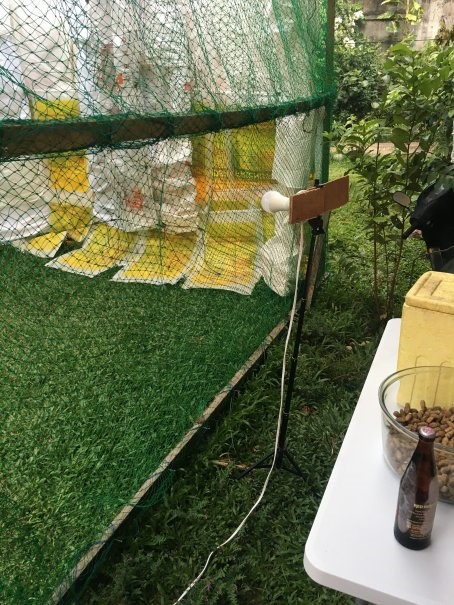
If you play indoors
or at night, you will need sufficient lighting for the launch monitor device to
detect the ball. With the Shot Vision app, a 12-watt bulb is recommended for
sufficient lighting. The bulb needs to be positioned behind the cage wall and
approximately 16 inches above ground.
Surprisingly,
the Shot Vision app gets the least number of detection fails at night where the
lightbulb is the light source. The app is also pretty reliable when it’s cloudy
or there is no glare from the sun (e.g. early morning or late afternoon). The
app fails to issue a reading more often when it’s bright and sunny. It’s
probably because the glare from the sun impedes the ability of the app to
capture and process the high speed movement of the ball.
The
following are the cost estimates for the tripods and lighting required to use
the Shot Vision app in a setup that accommodates both a left handed and right
handed player:
1) 2 10-inch tripods: P280 (including
shipping)
The tripod
should allow you to position the camera lens on the Iphone between 10 to 11
inches above ground.
I recommend
the 26cm (10-inch) octopus pod that is quite popular in the Philippines. If you
buy it at the store, it usually costs P300 each or P600 total. But online, you
can get 2 for only P280 which includes shipping.
Move the Iphone a little bit to the left of the tripod bracket to prevent the volume buttons from getting pressed.
If it is available, choose the tripod with a bolt mechanism to hold the phone.
If the tripod uses a spring clip mechanism instead of a bolt to hold the phone, do the following to prevent the phone from slipping out:
- Bend down the upper bracket
- Fasten a stopper on the lower ledge using a wire. You can drill a hole or heat up the wire on a stovetop until it’s hot enough to pierce through plastic.

2) 2 extension-chords: P873
The length of the first extension-chord will depend how far the cage is from the nearest electrical outlet. Therefore, it’s most likely more economical if you make your own. The cost computation here assumes the cage is 10 meters from the nearest outlet. You will also need a 3-meter extension-chord for the other side (e.g. left handed side).
- 13 meters #16 flat duplex chord: P49/meter = P637
- 2 Plugs: P26 each = P52
- 2 4-outlet extension boxes: P92/each = P184
3) 2 12-watt (P145 each) and 1 18-watt (P200) bulbs: P490
Note the
18-watt bulb will be used for the target strips.
3) 2 clip lamps: P234 (including shipping)
If you buy
it at the store, it usually costs P300 each or P600 total. But online, you can
get 2 for only P234 which includes shipping.
The clip
does not hold well so you should tie it to the frame with a ½ inch strip of
tire interior to re-inforce it. You can get used interiors for free at most
vulcanizing shops. Make sure the interior strip goes into the hole in the clip
so it does not slip off.

4) lamp for target strip lighting: P469
You can assemble your own lamp using a tripod and a piece of plywood. You can use the left over plywood from the bunker dish which we will be constructing later on. You can buy a 160 cm (5 feet) tripod for P215 online which includes shipping. It is better to buy the electrical parts at the hardware store instead of online because even if it is cheaper online, the shipping cost for each item will make it more expensive overall.
- Bulb socket: P32
- 4 meter #16 flat duplex chord: P196
- Plug: P26
- Tripod (that can adjust to 5 feet): P215
G. Putting Board and Chipping targets
The barrio
golf facility does not have to be perfectly flat. However, you should be able
to place the ball anywhere on the putting board without it rolling due to the
slope. I did a simple experiment and found out that the maximum allowable slope
without the ball rolling off is 4 degrees (arcsin(3.5 inches / 48 inches)).

Tools:
- Measuring tape
- Rubber tee
Materials (total cost estimate = P2,479):
1) ¾-inch thick 4 feet X 8 feet plywood: =
P1,300
This is the
standard size at most lumber yards so there is no cutting needed.
2) Permanent marker (pentel pen): P157
3) 23.5-inch inner-diameter and 8.5-inch height
plastic basin (planggana): P200
In Cebu
City, the cheapest place you can buy it is in Taboan public market.
4) 4 pieces, ~2-feet X ~3-feet rice sack: P7
each = P28
5) Duct tape: P405
6) 1 sack of fine beach or construction sand:
P75
In Cebu
City, you can buy fine construction sand at PTL Housing Supply in Andres
Abellana Extension, Guadalupe. You only need around a gallon of sand for the
chipping basin. But you will need a lot more sand for the bunker dish which we
will be constructing later on. So go ahead and buy 1 sack.
7) Water bottle 2.25 diameter and 8.25 inches
height (putting target)
8) Water bottle 3 inches diameter and 10
inches height (birdie chip target)
9) Panel carrier: P314 (including shipping)
If the cage
is outdoors, it’s better to always store the putting board indoors to lessen
deterioration due to the sun and rain. The putting board can easily be carried
by 2 people. But it can be a bit heavy for 1 person. A panel carrier makes it
much easier for 1 person to carry the putting board.

Step 1: On one end of the board, draw a dot 2
feet from any side edge and 3 inches from the front edge. Use the tip of a
rubber to draw the dot boundary.

Step 2: On the other end of the board (back
edge), draw 9 dots the same way. They should be 5.25 inches apart, starting 3
inches from any side. All 9 circles should also be 3 inches from the back edge.
Label each circle in the following sequence form left to right: 2, 4, 6, 8, 1,
9, 7, 5, 3. These will be the markers for the 8-foot putt ball placement (1st
putt attempt).

Step 3: On each side of the board, draw the
same type of dots 3 inches from the side edge and 4 feet from the front or back
edge. These will be the markers for the 4-foot putt ball placement (2nd
putt attempt).

Step 4: To protect the plastic basin and
prevent the ball from bouncing/lipping out, use 4 sacks and duct tape to cover
the plastic basin. The bottom of the basin should also be lined with 2 folded
sacks and an inch of sand layer.

H. Bunker Dish and Bunker Net

The bunker
shot gives the player an opportunity to save par. The player just needs the
ball to go over the bunker net for the shot to be counted as a success. Ball
speed is not measured and the ball does not have to hit any target.
Tools:
- Saw
- Power drill
- ¼-inch drill bit
- 1/8-inch drill bit
- Scissors
- Pencil
Materials (total cost estimate = P558):
1) used motorcycle tire with at least 17-inch
inner-diameter: (free)
You can get
used motorcycle tires for free at most vulcanizing shops.
2) ¼-inch X 4 feet X 8 feet plywood: = P530
You only
need 2.5 feet by 5 feet. The leftover will be used for the lamp and a
precautionary blocker in case a beginner grazes the ball.
3) 20 feet, 5mm (3/16 inch) thick nylon rope:
(use the left overs)
4) masking tape (use left over)
5) fine beach or construction sand: (use
left over from chipping basin)
6) 2 pieces, 1/8” X 2-inch screw: (use the
left overs)
7) 4 pieces, ~2-feet X ~3-feet rice sack: P7
each = P28
8) pint or quarter gallon ice cream container
or Tupperware to scoop the sand
Step 1: Cut 2 squares of ¼-inch thick
plywood. The size of the squares will depend on the size of the motorcycle
tire. It should be such that there will be at least 2 inches between the
motorcycle tire and the edge of the square board.
Step 2: Trace the outer and inner diameter of
the square on the top board.
Step 3: Put the 2 square boards together and
drill 3 pairs of ¼-inch holes for the chords that will hold down the tire to go
through.
Step 4: Tie the tire to the double layered square
board. You can wrap the ends of the chord with masking tape so it will be
easier to thread through the hole.

Step 5: Fill the tire with sand.
Step 6: Cut 2 chords 10-foot long each.
Step 7: Use scissors to make holes on the
stitched corners of 4 rice sacks. The hole is for the rope to go through.
Step 8: Insert the 4 sacks into the 2 ropes
in such a way that the sacks will overlap around 4 inches.
Step 9: Tie the middle of the overlaps to
prevent the sacks from slipping away from each other and creating a gap.

Step 10: Screw in a 2-inch screw on the net
hanger on both sides of the cage 5 feet away from the entrance. Drill a
1/8-inch hole so it will be easier to screw in the screw.

Step 11: Create overhand knots on the ends of
the chords. The bunker net is installed by hooking the hanger screw in between
the braids of the chord.
The bunker
net can also serve as a fence to prevent pets from defecating and urinating in
the cage.

I. Scorecard and Rules Printout
Making the
scorecard involves a little bit of origami. The following are the steps:
1) Fold a
long bond paper lengthwise into 3 parts, then then fold it lengthwise again
into 4 parts.


3) The
creases are the column and row borders. Draw a line along all the creases
except the first column.
4) Write the
hole numbers 1 to 9 on the headings of the 2nd to 10th
bordered column. Write “total (par 33)” on the heading of the last (11th)
column.
5) At this
point, I suggest you make lots of photo copies on this empty scorecard. If
playing 18 holes, you can use the backside or use another scorecard for the 2nd
9 holes.
6) The first
column, which is the wide column, will contain the player’s name, tee (e.g. blue tee) and handicap index. It is
also where players will sign after the game.
7) The upper
left hand box is where you write the launch monitor device information. Example,
if using the Shot Vision app, write down the Iphone model and app version. You
can find the app version in “Settings/General/Iphone Storage/Shot Vision”.
8) The upper
left hand box is also where you will write the mode being used (e.g. full set
w/ bunker).
9) Optional:
You can put the par and required mph beside the hole number for easy reference.
Example, when playing from the blue tees, the heading for column 5 would be “5
4/200” because it’s a par 4 200 mph hole.

Also go to https://bit.ly/barrio-golf-rules to download and print the rules so the players can easily refer to it during the game. It would be a good idea to put the scorecard and rules printout on a clipboard.
J. Miscellaneous Tips
Practice on
the sack wall instead of target strips because a sack on the sack wall is
easier to replace. You can just hang a chord as your practice target.

Disassembly
is the reverse of assembly.
Make sure
you undo the knob (overhand knot) at the end of a chord so it doesn’t get stuck
on the net and it will be easier to untie the chords.

The first
thing you do when removing nets is unhook the netting on all net holder screws.

When
transporting, put each net size in separate rice sacks and label properly.

III. Where to Buy Cheap Golf Clubs and Golf Balls
In the Philippines, you can find used golf clubs online (Shopee and Lazada).

It is recommended to start out with the old models. Aside from being much cheaper, the older models are better for training purposes because they are more difficult. The objective of barrio golf is to develop the important skills in golf. Therefore, more difficult clubs such as older clubs are recommended. It would be like basketball players training with ankle weights or dragging tires. Your buddies can just set a rule where during the game, players have to take turns using the same clubs.

You can also
ask around if they know someone who is an avid golfer. Most golfers have very
old golf sets that they want to get rid of.
As barrio
golf becomes more popular, it might be difficult to find used golf clubs. Fortunately,
unlike playing on the golf course where each player needs to carry their own
clubs, players can share or take turns using the same clubs. A barrio golf facility just needs one set of golf clubs.
Besides, you really don’t need a full set of clubs to enjoy and master the important skills in golf. All you need is a 7 iron and a putter and just play the 7-iron mode in barrio golf.
You can buy
new 7-irons and putters online for around P1,000. They are not the top brands.
But as I said earlier, the more difficult golf clubs are better for skills
development.


You can buy
used golf balls online for around P18 each.

The most
important skill in golf is putting. Putting is a skill you need to keep
practicing every day at home. Therefore, it’s better if you have your own
putter. Fortunately, it is very cheap to make your own putter. You can buy a
20-foot by ¾-inch square tube 1mm thick at a construction supply store for
around P450. You can make 50 putters out of this using a mop or broom handle as
the shaft. You can also use a 1-inch diameter PVC pipe as the shaft. Just tie
the shaft and putter head with tire interior strips. You can get used tire
interior for free from most vulcanizing shops.

IV. Introduction to Golf
A typical
golf course has 18 holes. Each hole has a tee box, a fairway and a green. The
hole is located on the green. To play a hole, the player starts from the tee
box. Between the tee box and the green is the fairway.
Sometimes,
there are bunkers or sand traps on the fairway and around the green. There is
no penalty if the ball ends up on a bunker. It’s just harder to hit the ball
from the bunker.

The objective
is to keep hitting the ball with a club until the ball goes into the hole. Each
hit counts as 1 stroke. The total number of strokes is your score. The player
with the lowest score wins.
A player can
have at most 14 clubs in the golf bag. There is no rule that requires which
clubs a player needs to have. But a typical golf bag contains a driver (1
wood), 3 wood, 5 wood, rescue (7 wood), 3 iron, 4 iron, 5 iron, 6 iron, 7 iron,
8 iron, 9 iron, pitching wedge, sand wedge and a putter. Some golfers choose to
have an additional sand wedge in exchange for a rescue or 5 wood.

The clubs
have different clubhead loft and shaft length, which determines the ball trajectory
and distance. The higher the number of the club, the higher the clubhead loft
and the shorter the shaft. Woods have longer shafts and lower clubhead lofts
compared to the irons. Wedges have higher clubhead lofts and shorter shafts
compared to the irons.
A club with
a longer shaft can make the ball go farther. A club with a higher loft can make
the ball go higher. Example, a 3-iron will go farther and lower than a 9-iron
because it has a longer shaft and lower loft.

How far the
ball goes depends on the ability of the player. Example, the average distance
using a driver is 205 yards (~112 mph ball speed). Elite golfers such as touring
professionals usually hit their driver 300 yards (~165 mph ball speed).
Beginners usually hit their driver 180 yards (~104 mph ball speed).
When hitting
from the tee box, the player has the option to use a tee. After hitting from
the tee box, the player is not allowed to use a tee (in barrio golf, a tee is
required for all shots that require an mph reading).

When the
player is near or around the green, the term used to hit the ball into the
green is called “chipping”. Different players have different preferences on
what club to use when chipping. It usually depends on the terrain and how high
the ball needs to go. If the terrain is smooth enough, a player might use a
putter. If a player needs the ball to go high to get over some rough or bumps,
the player might use a higher loft club such as a pitching wedge

If the ball
is in a bunker near the green, a sand wedge is usually used to get the ball out
of the bunker and into the green.
When the
ball is on the green, a putter is used to putt the ball into the hole.

Holes have
different distances ranging from 75 yards to 650 yards. A hole that is 250 yards
or less is a par 3. A hole that is between 250 and 450 yards is a par 4. A hole
that is longer than 450 yards is a par 5. Scoring a par on a hole means your
score is the same as the par category for that hole. Example, in a 150-yard par
3, if you score a 3, that means you parred the hole. A par is a good score. If
you score a 4 or 1 over par (+1), it's called a bogey. A bogeys is still ok. If
you score a 5 or 2 over par (+2), it's called a double bogey. A double bogey is
bad. If you score a 6 or 3 over par (+3), it's called a triple bogey. A triple
bogey is very bad. If you score a 2 or 1 under par ( -1), it's called a birdie.
A birdie is very good. If you score a 1 or 2 under par ( -2), it's called an
eagle or hole in 1. A hole in 1 is very rare. Some golf tournaments award a car
to a player who scores a hole in 1 or eagle on a par 3.
Here's
another example. In a 475-yard hole, if you score a 5, it's a par. If you score
a 4, it's a birdie. If you score a 6, it's a bogey. If you score a 3, it’s an
eagle.
Here's an
example of how to play a hole. Let's say the hole is 350 yards. That means it's
a par 4. The player hits a driver from the tee box. If the ball ends up on the
fairway 200 yards away, this means the player only has 150 yards left to the
hole. The player uses a 5 iron for the second shot. (The choice of clubs
depends on how far the player can hit. Example, professionals normally use a 9
iron to hit 150 yards.) The player makes a bad shot and the ball goes out of
the fairway and into the water or hazard. The player will need to drop another
ball near the area where the ball went in the hazard and get 1 stroke penalty.
Let's say the player has only 50 yards left to the hole. The player uses a
pitching wedge and hits the ball into the green. It takes the player 2 putts to
put the ball in the hole. For this hole, the player scored a 6 which is a
double bogey or a +2.
"On the
green in regulation" means you are on the green after "par minus
2" or less shots. Example if it's a par 5 and you are on the green after 3
shots (5-2 = 3) or less, it means you are on the green in regulation. If you
are on the green after 4 shots or more, it means you are not on the green in
regulation. If it's a par 4 and you are on the green after 2 shots (4-2 = 2) or
less, it means you are on the green in regulation. If you are on the green
after 3 shots or more, it means you are not on the green in regulation. If it's
a par 3 and you are on the green after 1 shot (3-2 = 1), it means you are on
the green in regulation. If you are on the green after 2 shots or more, it
means you are not on the green in regulation.
V. How to Play Barrio Golf (Rules)
A. Safety First
Just like
crossing the road, golf is actually quite safe as long as you follow common
sense safety rules. But just like crossing the road, golf can cause serious
injury or even death if you don’t follow the safety rules. Not allowing barrio
golf in the barrio because of safety concerns is like never travelling on
vacation because the plane might crash or the boat might sink.
1) Always
inspect the netting and rice sacks before the start of every game. Immediately
patch a hole on the net. If the net has become brittle, replace the entire
netting. Immediately replace a rice sack that is worn out.

2) Always
follow the ball placement rules. They are designed for safety.
3) Always
check if someone is near you or approaching you before swinging the club.
B. Barrio Golf Rules and Rationale
The hitting cage shall be 12 feet (4 yards) long and 9 feet high. The reason for the length specification is 12 feet is a common standard length of lumber sold in construction supply stores and lumber yards. So it minimizes the cutting and connections required. The reason for the height specification is that fishing nets are sold 6 feet wide. So the walls can be covered lengthwise using only 2 strips of net and still have enough overlap for safety.
Unlike
playing in a golf course where players are not allowed to share clubs, in
barrio golf, players are allowed to take turns using a club.
There will
be 9 holes. Just like in real golf, each hit counts as 1 stroke. A player
finishes a hole from drive to putting before another player takes their turn.
Barrio golf
uses ball speed in miles per hour (mph) instead of distance. The reason for
this is, the objective of barrio golf is to make it affordable to more people,
and the free version of the Shot Vision app only issues ball speed reading. In
case the launch monitor device can only issue yardage readings, the equivalent
yardage of an mph requirement is provided in this documentation. An attack
angle of 0 degrees is assumed in the conversion.
All
participants of a game or tournament shall use the same gadget and app version.
The launch
monitor device information shall be written on the upper left corner of the scorecard.
Example, if using the Shot Vision app, include the Iphone model and app
version. You can find the app version in “Settings/General/Iphone Storage/Shot
Vision”.
Unlike golf
courses which can have different yardages for the holes, all barrio golf facilities
shall have the same mph requirements. This simplifies the handicapping system.
There will
soon be a barrio golf app which includes a handicapping system. For now, you
can maintain your own handicapping system within your friends or club.
The following
mph numbers are blue-white-red tees respectively. White tees mph are always 90%
of blue, while red tees mph are always 80% of blue.
Hole 1: par
4: 225-202-182 mph ~ 403-367-331 yards
Hole 2: par
3: 85 -76-68 mph ~ 137-123-111 yards
Hole 3: par
5: 300-270-243 mph ~ 534-486-442 yards
Hole 4: par
3: ball 8.75 inches below feet: 75-67-60 mph ~ 117-105-94 yards
Hole 5: par
4: 200-180-162 mph ~ 364-328-295 yards
Hole 6: par
3: ball 17.5 inches below feet: 65-58-52 mph ~ 101-91-82 yards
Hole 7: par
5: 325-292-263 mph ~ 578-520-468 yards
Hole 8: par
3: ball 8.75 inches above feet : 75-67-60 mph ~ 117-105-94 yards
Hole 9: par
3: ball 17.5 inches above feet : 65-58-52 mph ~ 101-91-82 yards
Total par:
33
Shots that require an mph reading:
All shots
that require an mph reading shall always be tee’d up between 1.75 inches to
2.25 inches above the firm layer of the mat. The reason for this is, one of the
objectives of barrio golf is to develop the important skills in golf, and not
teeing up the ball can spoil the player.
If the ball
is not tee’d up high enough, grounding can still result in a good shot because
the clubhead can just bounce off the matt. So the player won’t be aware there
is something wrong with his/her/eir/pers/their/vis/xyr/hir swing until he/she/per/they/ve/xe/ze/zie
scores triple bogeys out on the golf course. This explains the mystery that
baffles many golfers where a lot of mistakes that happen out on the golf course
does not happen in the driving range.
If the ball
is tee’d up high enough, hitting too behind the ball will always result in a
very low mph reading. The ball will pop up, or the player gets punished with a
very annoying electrocution feeling or vibration on the hands. If the ball is
not tee’d up, the mat can absorb the vibration and the player won’t feel the
punishment, so the player can’t benefit from this effective feedback mechanism.
It is
recommended that the ball placement should not be more than 1 foot from the entrance
column of the cage frame when hitting shots that require an mph reading. Note
this is a recommendation, not a rule. The reason for this is to prevent the
club from hitting the frame behind the player during the follow through. But if
let’s say the cage is 12-foot wide, then 3 feet from the frame column should be
safe distance.
If the
launch monitor device needs to be outside the cage in order to abide by the
ball placement recommendation, just lift up and tie the part of the net that is
obstructing the camera. If a beginner is hitting, use the left over plywood
from the bunker dish construction as a precautionary blocker in case the
beginner grazes the ball with the toe of the clubhead.

Except when
putting, the ball placement shall never be inside the cage. The ball should at
least be touching the imaginary line between the entrance columns of the cage
for it to be considered “not inside the cage”.
The ball
placement can be outside the cage. But for safety reasons, when hitting shots
that require mph reading, it is recommended that the imaginary line that passes
along the ball and is perpendicular to the target line shall go in the cage or
at least touch the entrance column of the cage frame. This prevents a dangerous
fast ball from straying out of the cage. Note this is just a recommendation,
not a rule.

Taller than
average players or players with longer than normal shafts might need to move
back further a little to prevent the club from hitting the frame behind during
the follow through. Just use the left over plywood from the bunker basin
construction as a precautionary blocker in case the player grazes the ball. Cages
that are 12-foot wide should not have this problem.
When hitting
ball-above-feet, if the launch monitor device also needs to be elevated, it
shall be placed on a stool with the same height as the stool used to elevate
the mat. It is also recommended that the ball is within 1 foot from the column
frame. A 5 iron is the recommended club for ball-above-feet shots. (If the time
required to reposition the launch monitor device in ball-above-feet holes
concerns you, keep in mind it’s still much less compared to the amount of time
players can take looking for their ball and reading the greens in an actual
golf course.)

All mph (or
yardage) readings will have to be rounded off to the lower whole number.
Example. 69.9 mph will be recorded as 69 mph. 120.1 mph will be recorded as 120
mph. In other words, just drop the decimal part.
Each mph reading
shall be recorded on the score card. To avoid confusion, mph numbers that are
beside each other on the scorecard shall be separated with “+”. Example, if the
first shot was 122 mph and the second shot was 88 mph, “122 + 88” should be on
the scorecard, not “122 88”. The scorer can also write “88” below “122”.
If the
player hits a target strip but the launch monitor device fails to issue an mph reading,
the shot shall be recorded as an “e” (error) on the scorecard and the player is
required to redo the shot without any penalty. The “e” recording has no effect
on the score, but the data will be used by the barrio golf app to generate
statistics and compare the reliability of the different launch monitor devices.
The ball
needs to hit the 1-foot wide target strip and not touch the 3-foot wide target
strip behind it for the entire mph reading to be counted. So if the ball only
grazes the 1-foot target and hits the 3-foot target, it is considered as
missing the 1-foot target and hitting the 3-foot target.
The 3-foot
target simulates a rough on the fairway. If the ball hits the 3-foot target and
not touch the sack wall behind it, 25 mph will be deducted from the ball speed
reading (even if it grazes the 1-foot target), and the result will be recorded
on the scorecard with an “r” (rough) suffix. Example, if the ball hits the
3-foot target strip at 128 mph, “103r” will be recorded on the scorecard (128 –
25 = 103).
If the ball
touches the sack wall, it is considered a miss on both the 1-foot and 3-foot
target strips (even if the ball grazes the 3-foot target). If the ball hits the
ceiling or the floor or other parts of the hitting cage before hitting a target
strip, as long as the ball never touches the sack wall, it is considered a hit
on the target strip. Although most likely the player would still incur a penalty
in the form of a very low or no mph reading
If the
player misses both target strips, 50 mph (75 yards) will be recorded on the
scorecard with the “m” (miss) suffix. That means a player can still reach the
green of a 350 mph par 5 in 7 strokes even if the player never hits any of the
target strips. This simulates a real golf course where the player will always
reach the green at some point no matter how bad the player is playing. Note the
“m” suffix is only for data gathering purposes and does not affect the score.
Even if the mph reading is below 50 mph, as long as the ball hits a target
strip, the mph should still be recorded on the scorecard,
If the ball
bounces off the floor or ceiling of the hitting cage and hits the target strip,
then it's still considered a hit. Although if this happens, most likely the
launch monitor won’t be able to give the mph. If it does, the mph will be very
low.
You might be
concerned after seeing reviews in the internet that the Shot Vision is not that
reliable and precise. On rare occasions, the app fails to issue an mph reading
even if you hit a perfect shot. Sometimes, the mph reading is much higher than
normal. Sometimes, it’s much lower than normal. Example, a shot that is supposed to be around 110 mph might register as 45 mph.
But it’s
also like that when playing on a golf course. Sometimes, you hit a perfect shot
and your ball ends up on a very bad lie in the middle of the fairway, costing
you a stroke. Sometimes your ball lands on the cart path and bounces 50 yards
farther. Sometimes, your ball goes 20 yards farther than normal because it’s
with the wind. Sometimes, your ball goes 20 yards shorter because it’s against
the wind. Luck is part of golf.
A player is
considered “on the green” if the total mph equals or goes over the required mph
for that hole. Example, playing from the blue tees in hole 2 (85 mph required),
if the player’s drive registers 85 mph, the player is on the green after just 1
shot. If the player’s drive registers 150 mph, the player is also on the green.
But if the player’s drive is only 75 mph, the player is not yet on the green and
still has 10 mph left to go.
Putting:
Putting will
be on a ¾-inch plywood with 8ft x 4ft dimensions. This is a standard size you
can buy from the lumber yard (so there is no cutting needed). During a game,
the putting board shall be centered relative to the sides of the cage, and the
front edge shall be 2 feet from the front frame. This prevents any bias towards
the left handed and right handed players.

The putting
board does not have to be on a perfectly flat ground and may have slight
deformities and rough surface. This means different barrio golf facilities can
have different levels of putting difficulty. It’s also like that with golf
courses. Some courses have difficult greens and some have easy greens.
Besides, the
player can putt hard enough to negate any rough or uneven surface. Directional
accuracy is the difficult component in putting. If the player master the
directional accuracy, it will be easy to master putting on an actual green.
The
difficulty of an inclined putting board is also lessened because the amount of
break or allowance is almost constant the entire game. A player can just do a
few practice putts before the start of the game to determine the break or
allowance.
The putting
target shall be the small water bottle (2.25 inches in diameter and 8.25 inches
in height).

The putt is
considered a success only if the water bottle is not standing up after the
putt. Even if the water bottle gets hit or knocked over but ends up in a
standing position, then it will be considered a miss. In golf, it’s part of the
game where you hit a good shot but end up with a bad result due to bad luck.
When
attempting to complete an 8-foot putt, the player shall first putt from the back
edge, placing the ball on a dot with the same label as the hole number. Example
in the following photo, the player is putting on hole number 5.

If the
player misses the 8-footer, the player shall putt again, but this time from 4
feet away. If the player misses the 4-footer, 1 stroke will be added for a
total of 3 putts on that 8-foot attempt.

If the
player is required to complete two 8-footers and the player topples the water
bottle on the first attempts of both 8-footers, that's only 2 putts (best case
scenario). If the player misses the 4-footers on both attempts, the total would
be 6 putts (worst case scenario). The number of putts for each 8-foot attempt shall be recorded with a suffix “P” (putts).
Example, if the number of putts on one 8-footer attempt is 3, 3P is written on
the scorecard. If there were two 8-footer attempts and the player made both,
“1P 1P” should be written on the scorecard.
To increase
the life span of the putting board, only 1 foot of the player is allowed to
step on the putting board when putting. This explains why for the 4-footer, the
ball placement is near the edge of the board. To accommodate both right handed
and left handed players, the player can choose either side of the board. If the
player’s shoes are dirty, the player shall place a rug on the putting board
where the player will be stepping on.
Chipping:
There are 3
ball placements for chipping: 4 yards, 5 yards, and 6 yards. The ball placement
for a 4-yard chip is the same as a shot that requires an mph reading. At the
start of the game, the imaginary boundary lines for the 5-yard (15-foot) chip
and 6-yard (18-foot) chip shall be measured from the front edge of the putting
board and shall be marked using a golf ball. The player can go farther than the
required ball placement boundary, but not nearer. The ball has to at least
touch the imaginary ball boundary line.

Modes:
There will
be 5 modes of playing barrio golf: i) full set with bunker, ii) full set
without bunker, iii) flat mode iv) 3-club mode, and v) 7-iron mode. The mode
shall be written on the upper left hand corner of the scorecard beside the launch
monitor information.
i) full set with bunker
“In
regulation” means the player still has a chance for par. As long as the player is
“in regulation”, the player should always hit the next shot like a regular shot
that requires an mph reading. It does not matter if there is only 1 mph left to
the green. Example, if the player has 35 mph left to the green in a par 5 and the
next shot is the 3rd shot, that means the player is still “in
regulation”. If the player hits 78 mph and hits the 3-foot target, that's 78-25
= 53 mph, so the player is on the green in regulation. Or if the player hits 37
mph and hits the 1-foot target, it also puts the player on the green in regulation.
If the player misses both the targets, the player is on the green because of
the automatic +50 mph (+75 yards), but the player is considered “not in
regulation”.
If the
player is 1 mph to 50 mph (75 yards) from the green and “not in regulation” (no
chance for a par), the player gets the automatic +50 mph (+75 yards) advance,
and 50 (75) will be recorded on the scorecard with the suffix “a” (automatic).
Note the “a” suffix is just for data gathering and does not affect the score.
After the +50 mph automatic advance, the player is considered “on the green”,
but “not in regulation”. Example, if it’s a par 4, the player is 35 mph from
the green, and the next shot is already the 4th shot, “50a” will be
recorded on the scorecard, which counts as 1 stroke.
If the
player is on the green but not in regulation, the player will need to complete
two 8-footers.
Birdie-chip:
If the
player is on the green in regulation, the player gets to do a “birdie-chip”. The
letter “B” (birdie-chip) is recorded on the scorecard, regardless whether the
player makes the birdie or not. To prevent confusing the letter “B” with the
number “8”, draw a vertical line over the letter B.
The
birdie-chip target is the large water bottle (3 inches in diameter and 10
inches in height) placed on the front edge of the putting board (same location
as the putting target). The chip is considered a success only if the water
bottle is not standing up (just like in putting). Note a “birdie-chip”
opportunity is only awarded if the player is on the green in regulation.
For holes 1
to 3, the ball placement rules for the birdie-chip is the same for shots that
require mph reading. Let’s call this the 4-yard birdie chip.

For holes
4-6, the imaginary boundary line for the birdie-chip goes along the 5-yard (15-foot)
marker.

For holes
7-9, the imaginary boundary line for the birdie-chip goes along the 6-yard
(18-foot) marker.

The ball
placement can be farther but not nearer than the boundary line. The ball can
touch the imaginary boundary line.
If the
player makes the birdie (topples the water bottle), the player does not need to
putt and is considered finished on that hole with a score of birdie. Note the
birdie-chip is considered a miss if the water bottle is still standing, even if
it toppled over and unluckily ended up standing again.
If the
player misses the birdie-chip, the player will need to complete one 8-footer
putt. If the player makes the 8 footer, it's a par and 1P is recorded on the
scorecard. If the player misses the 8-footer but makes the 4-footer, it's a
bogey and 2P is recorded on the scorecard. If the player misses the 4 footer,
it's a double bogey and 3P is recorded on the scorecard.
Saving par:
If the
player still has 1 mph to 50 mph (75 yards) left to the green and not in
regulation, but the player still has an opportunity to save par (example, it’s
a par 3 and the player is about to do the 2nd shot inside 50 mph), the
player is given the opportunity to save par by hitting a bunker shot or
chipping into the chipping basin. The letter “S” (save par) is recorded on the
scorecard regardless whether the chip or bunker shot is a success or not. To
avoid confusing the letter “S” with the number “5”, draw a vertical line over
the letter S.
The yardage
and target will depend on the mph left to the green. If the player's chip or
bunker shot is a success, the player only needs to complete one 8-footer. If
the player misses the chip or bunker shot, the player will need to complete two
8-footers.
1) 41-50 mph (61-75 yards) to the green
The player
will have to hit a bunker shot. The bunker dish shall be a motorcycle tire with
at least 17 inches inner-diameter fastened on top of a board. The dish shall be
filled with fine beach or construction sand.
The ball placement shall not go outside the cage. The ball should at least touch the imaginary line between the 2 entrance columns. Since a sand
wedge has a short shaft, the recommended distance from the column frame can be
within 2 feet instead of just 1 foot.
The bunker
shot is considered a miss if the ball fails to go over the bunker net. Ball
speed is not measured during a bunker shot, and the ball does not have to hit a
target strip. The bunker net shall be 5 feet from the entrance column and the
same height as the side net hanger. The amount of sag on the next shall not be
more than 6 inches.

If it would
be impossible to sweep the splashed sand, lay out a 3-meter by 3-meter tarp to
catch the sand so it can be collected after the game.
If it’s
windy, you can hold down the tarp with used motorcycle tires.
2) 21-40 mph (31-60 yards) to the green
The player will have to do a 6-yard par saving chip into an 8.5-inch deep basin with an inner-diameter of 23.5 inches. The ball placement rule is the same as the 6-yard birdie-chip. The basin shall be lined up with rice sacks and sand to prevent the ball from bouncing out. If the ball does bounce out, it will be considered a miss. The ball has to end up and stay inside the basin for the chip to be considered successful. The ball is allowed to bounce off the board and into the basin. But if the ball hits any sack, it’s always considered a miss.

3) 1-20 mph (1-30 yards) to the green
Same as
21-40 mph, except it’s a 4-yard chip. The ball placement rule is the same as
the 4-yard birdie-chip.

The following is a summary. Notice that if the suffix is a small letter (lower case), it’s just for data gathering/statistics purposes and does not affect the score.
- e = error = a target strip was hit but the launch monitor failed to issue an mph reading
- + 50m = miss = missed both target strips
- r = rough = example: + 127r means mph reading was 152 mph, but 25 mph was deducted because the 3-foot target strip was hit
- in regulation, not yet on the green = the player still has a chance to be on the green in regulation
- B = birdie-chip = on the green in regulation = the player is awarded a birdie-chip opportunity = if the player makes the birdie-chip, no need to putt, else player needs to complete on 8-footer
- not in regulation, 51 mph or more left to the green = no chance for a par save, player has to complete two 8-footers after reaching the green
- S = save par = not in regulation, 1 mph to 50 mph left to the green, chance for a par save = if the player makes the chip or bunker shot, the player only needs to complete one 8-footer, else needs to complete two 8-footers
- 50a = automatic advance to the green = not in regulation, 1 mph to 50 mph left to the green, no chance for a par save = the player needs to complete two 8-footers
- P = number of putts (example: 3P means 3 putts)
To calculate the score for a hole, first ignore the lower case letters, then count each item excluding the putts as 1 stroke. Then add the number before each P to the score. Note that each mph including 50m and 50a should count as 1 stroke each. “B” and “S” should also count as 1 stroke each. The score for each hole should be recorded on the scorecard. To distinguish the score from the other items, the score shall be encircled. You can also write the over/under par amount (e.g. +2, -1, etc …) to make it easier to verify the total score.
All
information in the scorecard shall be entered into the barrio golf app. The
information will be used to improve the game. Example, if the percentage of
success with bunker shots is too low, that means the bunker shot is too
difficult, which makes the game less fun. Maybe the bunker net needs to be
moved forward a little to make it easier for the ball to go over. We also don’t
want something to be too easy. Example, if the percentage of birdie-chips is
too high, maybe use a smaller water bottle, or the ball placement needs to be
moved back a little.
The data can also be used by the app to generate stats and analyze which areas a player needs to focus on improving. The app can show a player’s putting average, drive average, accuracy (percentage for both 3-foot and 1-foot target strip, etc …
When
entering the scorecard data into the app, the “+” separators don’t need to be
entered. The only rule is to separate all items with spaces, and the score for
the hole should always be the last item in the string. Example “50m 90r e 102
81 1P 2P 7”. Although the correct case for the letters (e.g. e,m,r,B,S,a,P) is
important when writing on the scorecard, it is not important when entering into
the app. The rule on letter casing is only to make it easier for the scorer to
know which letters don’t affect the score.
ii) full-set without bunker
This mode
allows barrio golfers the option to be eco-friendly (preserving our beaches and
rivers). It’s the same as full set mode with bunker except instead of a bunker
shot to save par inside 41-50 mph, the player does a 6-yard chip into the basin
placed on top of the 17.5-inch stool. The legs of the stool shall be close to
the front edge of the putting board.

iii) flat mode
This mode
accommodates players with back problems. It is similar to full-set modes except
all shots are flat lies. No ball-above-feet and no ball-below feet shots.
iv) 3-club mode
Similar to
flat mode except:
1) Only 3
clubs allowed. The player is free to choose which clubs
2) There
will be no par save chipping and bunker shots. If the player is inside 1-50 mph
and not in regulation, 50a (automatic) will be marked on the scorecard and the
player proceeds to the putting board to putt.
v) 7-iron mode
It is similar to the 3-club mode, except only a putter and 7-iron is used.
All holes shall be 100 mph long.
The full mph reading will be recorded even if the player hits the 3-foot wide target. Meaning there is no difference between the 3-foot wide target and the 1-foot wide target.
There will be no minimum or automatic advance. If the player misses the 3-foot wide target, it will be counted as a stroke and 0 will be marked on the scorecard.
There will be no par saves. Upon reaching the green, the player will always do one 4-yard chip (similar to a birdie chip) and complete one 8-footer.
If the player misses the 4-yard chip, one stroke will be recorded on the scorecard as letter C. if the player topples the bottle, no stroke will be recorded, giving the player a 1-stroke advantage over a player who misses the chip.
The reason for this mode is it’s common to find a single 7-iron club sold online for only around P1,000. Combined with the home-made putter recommended earlier in this book, more people can afford to participate in this mode. This mode makes it possible for kids in the barrio to enjoy hours and hours of fun.
This mode by itself already develops most of the important skills in golf.
C. Barrio Golf Director
You might be
concerned that barrio golf has too many rules to remember and too many
equipment and gadgets to setup and adjust during the game. Just like on the
golf course where a player can hire a caddie, players can hire a barrio golf
director that would be in charge of the setup of the gadgets and paraphernalia,
directing (guiding the players), and scoring.
The players
can just enjoy the game and not have to worry about remembering the rules,
scoring, or setting up anything. The director tells the players what to do.
Example, the director informs the player the mph left to the hole, or if the
player needs to do a 6-yard chip into the chipping basin in order to save par.
The general
objective of barrio golf is to help the community. Students or even housewives
living nearby who can use the extra income can be trained to become barrio golf
directors and make it their sideline gig. Example, if there are 4 players and
each player chips in P100 for the barrio golf director (and maybe additional
P50 to the barangay hall office for maintenance and administration costs), it’s
still more affordable than playing on the golf course or digital simulator.
The director is also responsible for entering all the information in the scorecard to the barrio golf app.
While a player is preparing to hit a target strip, it’s the opposing player’s responsibility to request the barrio golf director to fix the target strip if it’s bulged out.

VI. How To Master Golf
A. Practice Every Day
You can
never master golf if you don’t practice every day. If you can’t practice every
day because of the availability of the barrio golf facility, you can build a
makeshift hitting cage made of only rice sacks and bamboo. There is no need for
target strips. Just hang a single chord in front of the target wall for target
practice.
Always keep
in mind that a very fast golf ball can cause serious injury or even death. Make
sure to use at least 3 layers of rice sacks. All gaps should be covered by at
least 2 layers. Always check to make sure there is no one around you before
swinging the club.
Most cement
and wooden floors can be used for putting practice. It does not have to be perfectly
smooth or level. Just putt hard enough to negate any uneven or rough surface. You
can also buy plywood and share the cost with 3 other players by cutting it into
3 parts lengthwise.
It’s more
efficient to practice hitting a target on the wall so the ball will just bounce
back and you don’t waste time and effort retrieving the ball. You can use a
strip of duct tape as the target.

B. Hitting Cage Math
When
learning anything, feedback is very important. It is important to know if what
you are doing is wrong or correct. Example, when practicing golf inside a
hitting cage and you miss the target by 1 foot, it is important to know if it’s
a good shot or not.
Here’s how
to compute the amount of error on the golf course for a given amount of error
inside the hitting cage:
For the same angle or degree of error, the ratio error/distance is the same in the hitting cage and golf course. Let’s make:
- e = error in the cage
- d = distance in the cage
- E = error on the golf course
- D = distance on the golf course
Therefore, e/d = E/D.

For the
1-foot target, the error is 6 inches or 0.5 feet. The length of a barrio golf cage
is 4 yards or 12 feet. 0.5/12 = .04167.
Therefore, the corresponding error on the golf course would be E = D(e/d) =
.04167(D). So if you hit within the 1-foot target strip in the cage with a ball
speed that goes 100 yards, that means out on the golf course, your maximum
error will be .04167(100) = 4.167 yards to the left or right. Which means even
if the green is only 4.167 (2) = 8.33 yards wide, you will still be on the
green. Note the average width of greens is 20 yards (10 to 30 yards).
For a 150
yard shot, you will be on the green that is .04167(150)(2) = 12 yards wide as
long as you hit the 1-foot target strip in the hitting cage.
The average width
of fairways is 45 yards (25 to 65 yards). If you drive 200 yards, you will be
in the fairway that is .04167(200)(2) = 16.67 yards wide if you hit the 1-foot
target strip. If you drive 225 yards, you will be in the fairway that is
.04167(250)(2) = 20 yards wide if you hit the 1-foot target strip.
What about the 3-foot target strip? e/d = 1.5/12 = .125. If you hit 100 yards, you will need a green that is .125(100)(2) = 25 yards wide if you hit the edge of the 3-foot target. Note some greens are 30 yards wide. Therefore, missing the 1-foot target and hitting the 3-foot target means you can still be on the green if the green is wide enough. If you drive 200 yards, you will need a fairway that is .125(200)(2) = 50 yards wide if you hit the edge of the 3-foot target. Note some fairways are 65 yards wide. Therefore, missing the 1-foot target and hitting the 3-foot target means you can still be on the fairway if the fairway is wide enough.
C. Limitations of Barrio Golf
If you
master barrio golf, you only need to practice a few rounds on the golf course
to easily beat 95% of the golfers around the world. The reason you still need
to practice a few rounds on the course is there are a few things that cannot be
learned in barrio golf that can only be learned on the golf course. The good
news is you will easily learn them after just a few rounds on the golf course.
The following are the components of golf that cannot be learned in barrio golf:
1) Club selection
In barrio
golf, it does not matter how much you overshoot the required mph for that hole.
As long as you go over the required mph, you are on the green. Therefore in
barrio golf, you don’t have to be precise with the club selection. You can just
choose a club that guarantees you will be over the green as long as you hit a
good shot.
Out on the
golf course, overshooting the green can be just as bad as being short of the
green. Therefore, you need to be precise with your club selection when playing
on a golf course. Launch monitors can give you a rough estimate on how far each
of your club can hit the ball, but most of them are not precise. Even if your
launch monitor is very precise, you still need to consider other factors such
as wind, ground slope and the hardness of the ground.
The good
news is club selection is the easy part of golf. You can also learn how far
each of your club goes at a driving range. But nothing beats playing on the
actual course to learn club selection. Even if you master the club selection on
one golf course, the club selection on another golf course could be slightly
different.
2) Distance control
Distance
control means knowing the amount of backswing and amount of force to exert on
the swing to achieve a certain ball distance for a given club. If the full
swing of your sand wedge goes 80 yards, that means you will have to have a
shorter backswing and/or exert a smaller amount of force to hit inside 80
yards.
You really
don’t need to play on the golf course to practice distance control. You can
practice distance control at a driving range. Many public golf courses and
driving ranges also have short game practice areas where you can practice
distance control for free.
You can also
practice at any open field such as grazing field, farm, or even an empty soccer
field. You just won’t learn how far the ball rolls after it lands on the green.
However, the speed of greens can be so different such that practicing distance
control towards a green does not really have a significant advantage over
practicing without a green such as a soccer field.
Distance
control is also an easy part of golf because you simply have to write down or
record on the notepad of your smartphone the estimate distance of a backswing
amount and amount of force for a given club. Directional accuracy is the
difficult part. Fortunately, you can master directional accuracy in barrio
golf.
3) Speed/break
on the greens
Unlike the
putting board in barrio golf, greens in a golf course can have very different
slope and speed ratings. If the green is not flat, you will need to judge or
anticipate the amount of break and speed of the ball. Example, if you are putting downhill, you
will need to hit the ball soft or else the ball will roll way past the hole and
it will much harder to make the next putt. If you are putting uphill, you will
need to hit the ball hard or else you will be way short. If the green is
sloping to the left, you will need to putt towards right of the hole because
the ball will break to the left.
Speed
control is the easy part of putting. Any golfer with enough practice and
experience can master speed control. Directional accuracy is the difficult
component of putting. Fortunately, you can master putting directional accuracy
in barrio golf.
However,
reading the break on a green is more like an inborn skill. Many golfers are bad
at reading greens even after many years of playing. Although practice and
experience still helps a lot.
In golf,
caddies are allowed to read the greens for you. So having a caddie that is good
at reading greens is an advantage. In developed countries such as the US, most
golfers can’t afford a caddie. But in developing countries such as the
Philippines, caddies are affordable and even required. So if you are a barrio
golfer in the Philippines dreaming of one day playing in an actual golf course,
don’t worry. If you happen to be bad at reading greens, your caddie can always
read the green for you.
4) Hook,
draw, slice and fade
A hook is
when the ball initially goes straight and goes left midway, resulting in the
ball ending up left of the target. A draw is when the ball starts slightly to
the right and curves slightly to the left midway, resulting in a good shot. A
slice is when the ball initially goes straight and goes right midway, resulting
in the ball ending up right of the target. A fade is when the ball starts
slightly to the left and curves slightly to the right midway, resulting in a
good shot. (If you’re a left-handed golfer, these terms are reversed.)

If you only
play barrio golf or practice in a hitting cage, you won’t know if your ball is
drawing, hooking, slicing or fading. Fortunately, if you master barrio golf,
that means you mastered the mechanics of the swing and you can easily make
adjustments or corrections at the driving range.
5) Wind,
terrain, and hardness of the ground
The wind,
slope of the fairways, and hardness of the ground can affect ball distance and
direction. Fortunately, these factors are mostly common sense and easy to learn
after just a few rounds on a golf course.
6) Course
management
Course
management during a game is basically making decisions based on risk versus
reward judgement or analysis. Example, if a fairway is very narrow and there is
hazard on the left and right, the player could choose to use a safer 5 iron
shot instead of a driver. It will probably be harder to score a par or birdie,
but it lessens the chance the ball will go to the hazard and end up with a
double bogey.
It’s almost
like choosing between stocks and bonds. If you invest your money in bonds, you
won’t earn that much, but there is only a very small chance you will lose
money. If you invest in stocks, there’s a bigger chance you will make a lot of
money, but there’s also a bigger chance you will lose a lot of money.
Course
management is also needed in barrio golf, but not much. Example, in a 200 mph
par 4, instead of hitting the driver to go 140 mph, it’s probably better to hit
a 5 wood to settle for a shorter but easier 115 mph on the 1st shot.
Anyway this only leaves around 85 mph for the second shot, which can easily be
achieved with a 7 iron. This course management is not that much compared to
playing on a golf course. Fortunately, course management is the easy part of
golf. It only requires humility.
6) Psychological
factors, obstacles, hazards, and bad lies
Two hikers
encounter a grizzly bear. Hiker A starts putting on his running shoes. Hiker B
says to hiker A, “Why are you putting on your running shoes? You cannot out run a bear”. Hiker A replies, “I don’t
need to outrun the bear, I just need to outrun you”.
A golf
course can have trees, ravines, ponds, bunkers, roughs, and divots that can
make the game more difficult and intimidating. Example, some holes in Cebu Alta
Vista golf course require you to cross a ravine. Even if you hit a very
straight shot but the ball did not go high and long enough to cross the ravine,
it will cost you a 1-stroke penalty. In barrio golf, there are no ravines. So
your second shot can still put you on the green in regulation even after making
a similar mistake on your first shot.

The
obstacles and hazards on the golf course can also make you more nervous and disrupt
your ability to hit a good shot.
On the golf
course, sometimes your ball can end up on a divot or bad lie. In barrio golf,
you will always be hitting from a good lie.
By now you
might be thinking, you are hiker A, your opponent is hiker B, and the obstacles
and hazards represent the grizzly bear. Not exactly. The best attitude is when
you consider your average score (handicap) as hiker B. Golf is a game where you
can play against yourself to try to beat your average score. So you really don’t
need to hit a good shot every time. You just need to score better than your
average score.
And the good news is, the better you become at barrio golf, the better you become at the golf course.
D. Free golf tutorials in the internet
The best way
to learn golf is to hire a coach. But if you can’t afford a coach, you can
still learn golf by watching free golf tutorials on the internet.
E. Tutorial for average golfers
The standard or orthodox swing taught by the coaches in Youtube is too difficult for an average golfer. That is why only 5% of golfers can have very good scores (break 80 on a golf course).
During the pandemic, I developed a simplified swing that allows most golfers to have very good scores. Even if you are not gifted with talent, my simplified swing allows you to play well and enjoy golf instead of suffer endless frustrations with the very difficult standard or orthodox swing. You can easily beat 95% of golfers who are using the standard swing.
However, my simplified swing is less powerful, so it won't stand a chance against talented golfers using the standard swing. My simplified swing also looks ugly. Golfers who've never heard about it will probably laugh at you. But after the game, they will be shocked at how good you are.
The complete tutorial for my simplified swing style is in https://bit.ly/intellectual-golf. If the link does not work, you can type in the full url: https://ian-crystal.blogspot.com/2020/03/golf-on-rails.html
You just need to follow and practice 50 pages of the "instant gratification" chapter of the book for 6 months and you will be at a skill level that 95% of golfers never achieve despite playing golf for many years.
Even if you are just a barrio golfer and never played on a golf course, if your boss at work happens to be a golfer and invites you to play, you can already play a decent game and your boss will be very impressed. You might even get a promotion :-)
Golf bars are also starting to be popular (also called screen golf, digital golf, or indoor golf). Imagine if you take your friends or girlfriend to one of these golf bars. They will be shocked at how good you are at golf especially if you play against rich golfer dudes and you win. The rich people will be impressed and maybe they will give you good job opportunities.
People in the golf bar will surely want to talk to you because they will be very curious about your very unorthodox swing technique. If you read the engineering section of my book, you can talk to them for hours and hours explaining the general principles that apply to all swing techniques. You might even end up working in the bar as a waiter/waitress and part time instructor to call centers and korean tourists.

There are many golf books and tutorials written by the top golfers and coaches in the world, but they are suitable only for golfers with exceptional talent. It's like they teach you to be a neurosurgeon instead of a nurse because a neurosurgen earns more money, even if you had bad grades in high school biology. Or it's like they teach you to marry a supermodel instead of a girl next door because a supermodel is more beautiful, even if you are just an average guy. It's like they teach you to eat at a high class restaurant instead of mcdonalds because the food has higher quality, even if you are just a construction worker. This is the reason why only 5% of golfers can break 80.
My golf tutorial makes golf as easy as driving a car. The only downside is that my techniques are not suitable for exceptional golfers who have the potential to compete at an elite level.
----------------------------------------------------------------------
Updates from the first edition:
- Cover the top of the sack wall area with tarp to prevent direct exposure from sunlight and prevent the sacks from becoming brittle.
- When a player is setting up to hit a target strip, it's the opposing player's responsibility to request the director to fix the target strip if it's bulging out.
- If the 1-foot target strip is not stiff enough, add more ties to the sides to prevent the strip from bulging out.
- So that it's easier to find the ball, the bottom of a sack should cover or overlap the top portion of the bottom sack, just like roof tiles.
(for more of my knowledge bombs, click the "ian's knowledge bombs" banner at the top of this article and choose any article in the table of contents that piques your interest)
No comments:
Post a Comment